Tonight's show and a simple promise
If you want 7 easy tips photographing 'blood moon' tonight, this concise guide will get you ready in under an hour. The total lunar eclipse peaks during totality from 11:04 to 12:03 UTC on March 3, 2026 (maximum at 11:33 UTC), and people across eastern Asia, Australia, New Zealand and much of the Americas can see the Moon turn coppery‑red. You don’t need a PhD or exotic gear to get satisfying pictures — a bit of planning, a tripod and the right camera settings will make the difference between a blurry blob and a sharp red Moon that tells the story of the eclipse.
7 easy tips photographing 'blood moon' — quick checklist
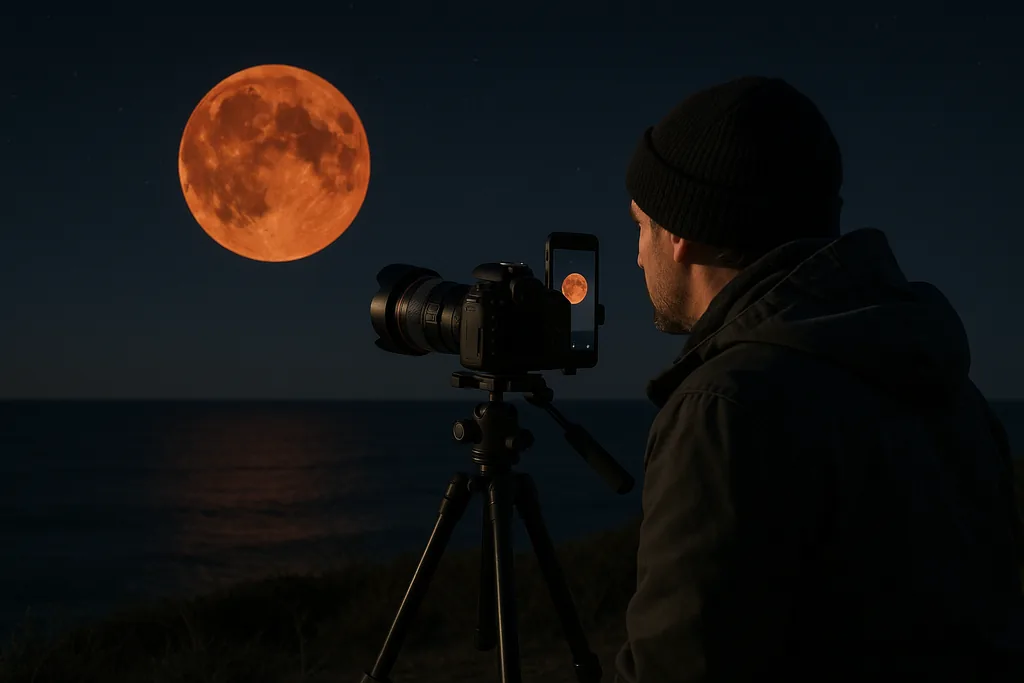
Start with a short checklist you can act on in the hour before the eclipse. First, check your local timing and confirm whether totality will be above your horizon using an app or observatory feed; cloud cover is the most common spoiler, so know the forecast. Second, set up a sturdy tripod and, if available, use a remote release or camera timer to avoid shake; stability matters more once totality dims the Moon. Third, choose a lens with reach (telephoto) or accept a wide-angle composition that includes foreground elements; both approaches work and tell different stories.
- Plan: know the exact local times for partial phase, totality and maximum so you don’t miss the red phase.
- Stabilize: tripod + remote release (or 2s timer) is essential for anything longer than ~1/30s.
- Practice: focus and test exposures on the Moon before the eclipse begins.
Finally, be ready to change settings as the Moon darkens: exposure that worked during the bright full Moon will underexpose the red Moon in totality. Aim to start shooting at least 30 minutes before totality to capture the progressive shadowing and to practice focusing and framing.
Camera settings and why you must adjust during the eclipse
The Moon’s brightness changes a lot during an eclipse, so one “set-and-forget” exposure rarely works. During the bright phases before and after totality you can use relatively fast shutter speeds (for example 1/125–1/250 s), moderate ISO (100–400) and an aperture near your lens’s sharp sweet spot (often f/5.6–f/8). As the Moon enters totality and adopts a deep red hue it becomes much dimmer: you will likely need to raise ISO (400–1600 or more), open the aperture if possible, and slow the shutter to fractions of a second or even 1–2 seconds depending on focal length and whether you track the sky.
Here are practical starting points you can try and then adapt on the fly: if you’re using a 200–400 mm lens, try 1/125 s, f/6.3, ISO 200 before totality and move toward 1/4–1 s and ISO 800–1600 during totality. If you have a longer focal length (400–600 mm) you’ll need slightly faster shutter speeds to counteract any residual vibration or tracking errors. Always bracket exposures: take sequences at ±1 or ±2 stops so you capture both lunar detail and the red tones that are easiest to see at slightly longer exposure.
Focal length, composition and including foregrounds
Which focal length is best? For a tight, full-disk Moon that fills much of the frame, 200–600 mm on a full‑frame camera is the standard recommendation — the longer the focal length, the more lunar detail you’ll resolve. If you want the Moon as a small but dramatic element in a landscape (for scale, landmarks or silhouettes), go wider: 35–100 mm lets you include foregrounds and create a sense of place. Either approach is valid; the choice depends on the story you want the image to tell.
When the Moon is low on the horizon — something many viewers will see in the Americas — atmospheric haze softens detail but adds color and mood. That can be great for silhouette compositions: expose for the foreground separately (or blend exposures later) so the Moon retains its reddish tint while the landscape keeps its silhouette shape.
Practical smartphone techniques for the blood Moon
Not everyone carries a mirrorless camera. Modern smartphones can make excellent eclipse photos if you work with their limitations and strengths. Use a phone tripod or clamp and enable any built‑in night or astrophotography mode. If your phone has a dedicated telephoto or periscope lens, use it to get a larger Moon in frame; if not, shoot wide with an interesting foreground and crop later.
- Lock focus and exposure on the Moon (tap-and-hold on many phones) and then slightly underexpose to preserve the red color rather than blowing out highlights.
- If your phone supports manual exposure or a pro app, follow the same ISO/shutter tradeoffs described for cameras: lower ISO and faster shutter pre-totality, higher ISO and longer shutter during totality.
- Consider using an inexpensive clip-on tele lens for better reach, but be sure to practice alignment beforehand.
Smartphone night modes often stack multiple frames automatically; this helps with noise at high ISO but can blur details if the Moon is moving relative to the stacking window, so test before the eclipse begins.
Focusing, live view and autofocus traps
Sharp focus is more important than any single exposure setting. Autofocus can hunt on a bright Moon or fail in dim totality; use live view on a mirrorless or DSLR and zoom in to focus manually on the lunar limb. If you must use autofocus, lock focus on the Moon during a bright phase and leave it locked through totality.
A few practical tips: switch to single‑point AF or manual focus, set the lens to its infinity marker and then fine‑tune while using live view enlargement. If you have a tracking mount, polar align beforehand; with a static tripod, keep exposures short enough to avoid motion blur from Earth’s rotation unless you’re tracking.
When during the eclipse is the red Moon easiest to capture?
Many photographers find the partial phases easiest because the Moon remains bright and fast shutter speeds preserve lunar detail. If your goal is to capture the red coloration itself, totality is the moment to aim for — but it’s also when the Moon is dimmest, so be prepared for higher ISO and longer exposures. The sweet compromise is to shoot continuously from the start of the partial phase through totality: you will capture sharp, detailed frames early and the red, atmospheric tone during totality, giving you choices in post‑processing.
Start photographing at least 30 minutes before totality to build a bracketed sequence and to rehearse focusing and framing under real sky conditions. If the Moon is near the horizon where you are, aim for a clear western or eastern view so buildings or trees don’t block the red phase.
Final checklist and live resources
Before you step outside, run through this quick checklist: tripod and remote or timer, charged batteries and empty cards, lens choice and spare lens if you plan foregrounds, practiced focusing and exposure brackets. If clouds threaten or the Moon is below your horizon, remember that several observatories and outreach projects will stream the eclipse live; tuning into a proven feed can still let you capture screenshots or record video if you prefer.
Above all, enjoy the experience. A lunar eclipse is slow and theatrical — unlike fleeting solar eclipses you have time to watch, learn and experiment with settings as the Moon changes. Bring warm clothes, a thermos if it’s cold, and a friend to help swap lenses or keep notes on which exposures you tried. The red Moon is one of those sky events that rewards preparation and curiosity in equal measure.
Sources
- NASA (total lunar eclipse guidance and timing)
- Griffith Observatory (public livestream and outreach materials)
- Virtual Telescope Project (international live observing campaigns)
- The Sky Live (eclipse timings and visibility calculations)

Comments
No comments yet. Be the first!